Encoder Installation for
Argo Navis Computer on 18 inch Starmaster Telescope
with
Argo Navis Review
This page summarizes installation of encoder mounting hardware and
subsequent use of an Argo Navis computer on an 18 inch Starmaster
Dobsonian telescope.
I purchased a used 1997-98 Starmaster telescope with an 18 inch f/4.5
Pegasus mirror in 2005. I have owned two other Starmaster telescopes with
Sky Commander digital setting circles/computer (Sky
Engineering, Inc.) and have been satisfied with their price and
performance. However, after seeing the newer Argo Navis Computer (Wildcard
Innovations, Pty. Ltd.) in operation by many observers at the
2005 Queensland
Astrofest, I wanted to install this larger, more expensive computer
with its high resolution encoders and increased capability. My used
Starmaster had never had an encoder set installed, so my first step in
installation was to find an encoder mounting hardware kit.
18" Starmaster Measurements
and Encoder Kit Installation
I started to take measurements on my telescope to find out the best JMI
encoder mounting kit or combination that might be work on my Starmaster.
Initial surveys and questions in September, 2005 revealed that neither JMI
representatives nor Gary Kopff at Wildcard Innovations had a stock
recommendation for encoder hardware kits for Starmaster telescopes. They
told me that the JMI encoder kit for the 18" Obsession telescope
would not mount on my Starmaster. I took initial measurements to have Gary
Kopff recommend JMI encoders that might work with my system.

Azimuth
bushing and bolt installed by Rick Singmaster during original
contruction of my Starmaster appears to be an Astro-Systems pivot kit
with drilled pivot bolt and encoder shaft lock screw. This original
superb construction by Starmaster greatly simplifies encoder
installation. |

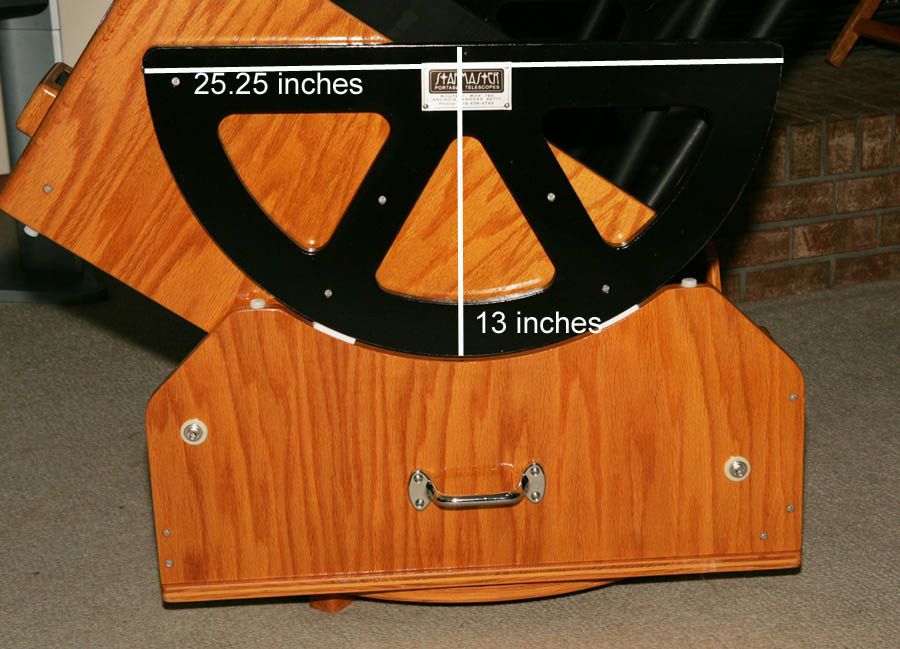
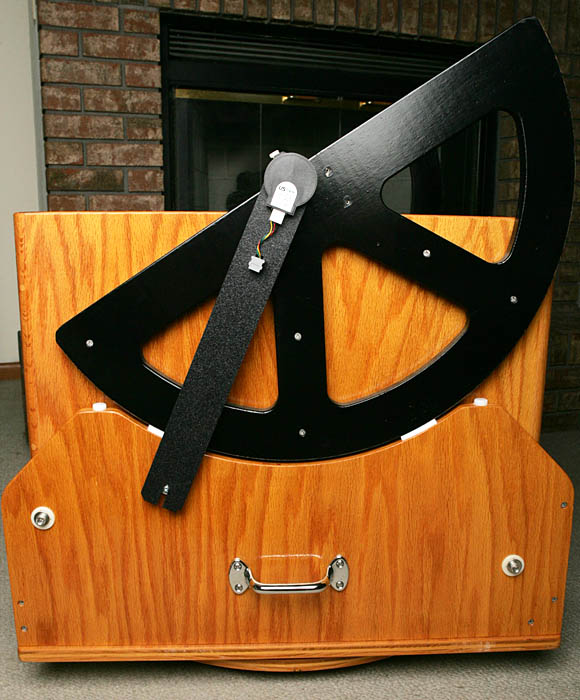
Altitude
Bearing (3/4 inch thick).
The center of the
altitude bearing diameter is about 12.5 inches. I ordered a 15 inch long
encoder mounting arm to be able to place the tangent arm anchor pin on
the rocker box (see below) |
- Other measurements:
- Clearance between rocker box and optical tube at closest point:
2 3/8 inches
- Clearance between top of azimuth bolt and optical tube at
closest point: 1 3/4 inches
- Ground board and rocker box are each 3/4 inch thick with 5/16
inch between.
After looking at the drawings for the JMI encoder kits, I was struck by
what appeared to be their relative complexity of design. I went back and
looked at photos I had from my other two Sky Commander installations. The
encoder mounting kit that Sky Engineering sells is the epitome of simple
and elegant functional design. I abandoned my plans to use JMI encoder
mouting hardware (Price: $170 USD) and ordered Sky Engineering's
ALT-AZ-1000 General Purpose Encoder Mounting Kit ($40). Because the stock
kit elevation tangent arm is too short for the altitude bearing on the 18"
Starmaster, I also ordered the 15" encoder mounting arm (ARM-EN-1500,
$12). I had to order the encoder kit through the mail from South Florida
since Sky Engineering doesn't have a web commerce site or accept credit
card purchases on line. On the same day, I ordered my Argo Navis computer
and long encoder cable on line from South Australia. About 10 days later,
I received items from Florida and Australia on the same afternoon.
Sky Engineering Encoder Mounting
Kit
The general purpose encoder mounting kit (ALT-AZ-1000) made by Sky
Engineering is well engineered and easy to install.
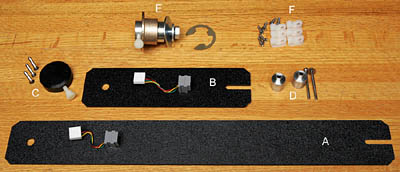
Sky
Engineering Encoder Mounting Kit (ALT-AZ-1000)
A =
Elevation Tangent Arm ( I ordered the 15" arm for my 18"
Starmaster); B = Azimuth Tangent Arm; C = Elevation coupler and wood
screws; D = Azimuth and elevation anchor pins and bolts; E = Azimuth
pivot bolt and bushing with retainer clip; F = Encoder cable clips and
screws. |

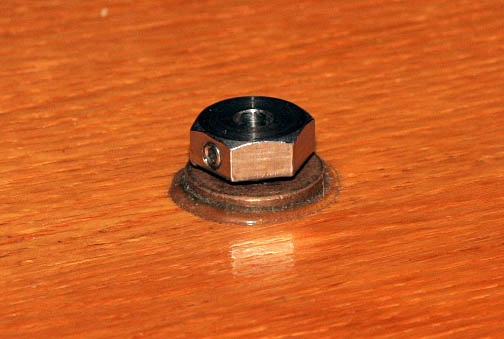
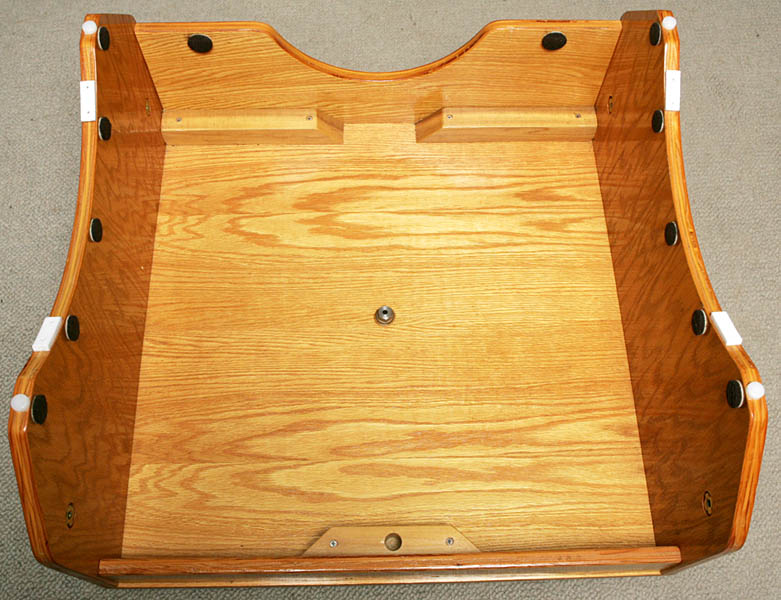
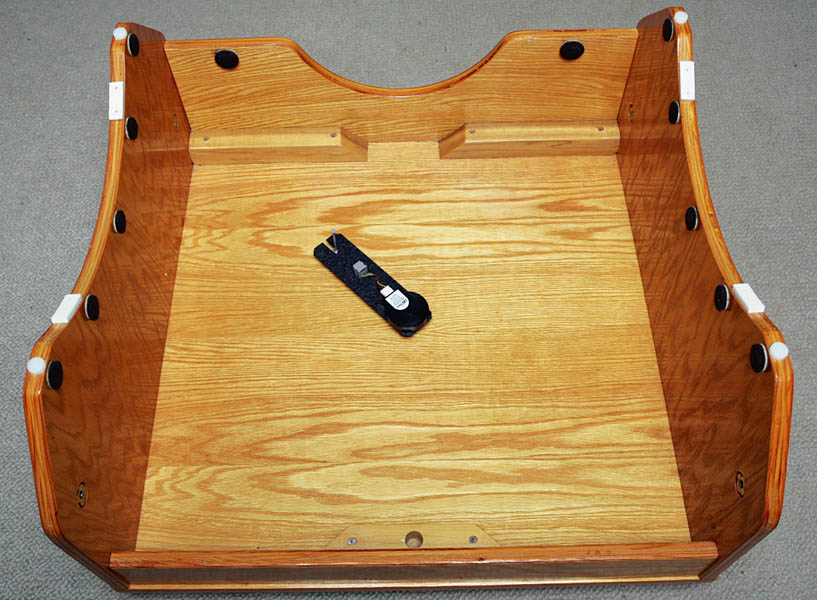
Bottom
of rocker box showing azimuth pivot bolt. |

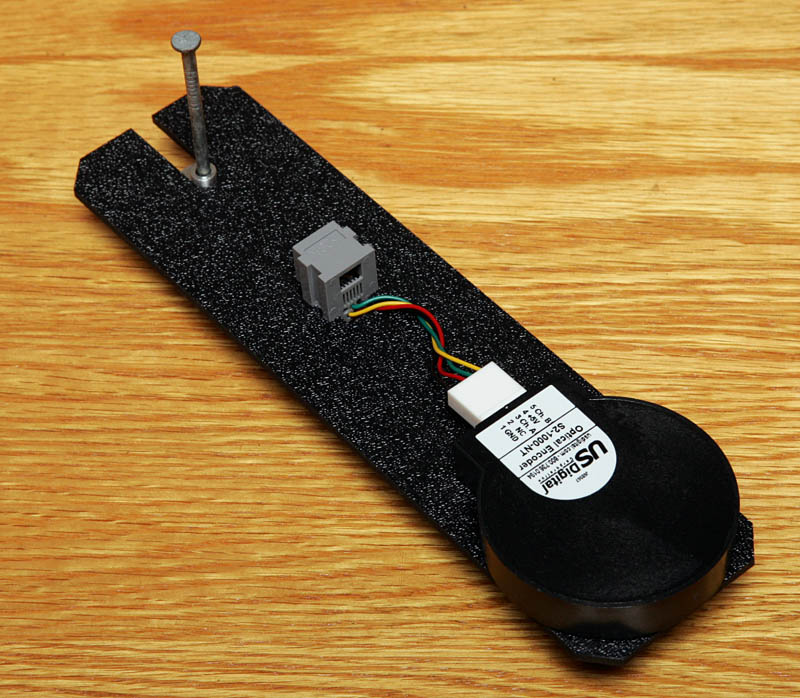
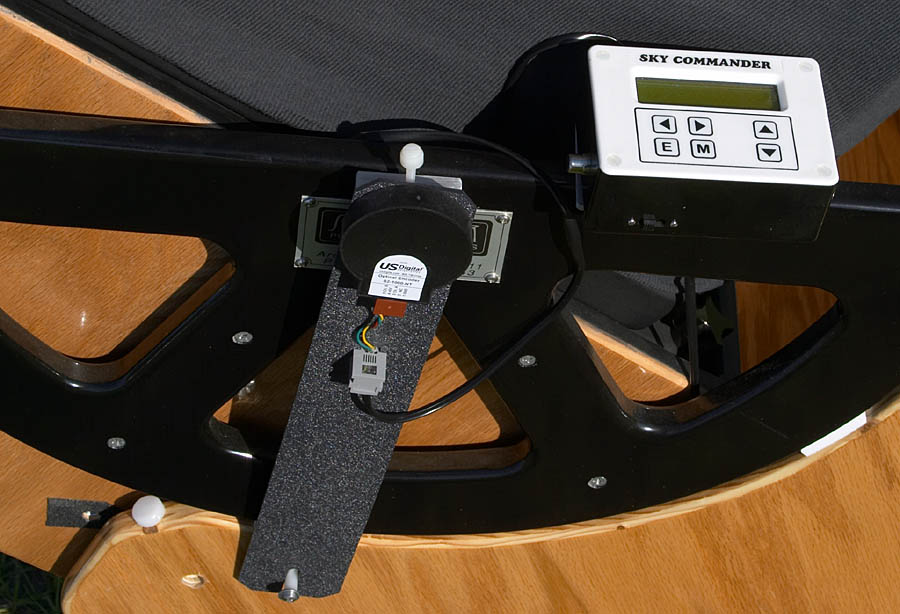
Mounted
encoder on azimuth encoder arm. Encoder shaft was locked in pivot bolt.
The tangent arm faced towards the front corner of the rocker box. Rick
Signmaster usually mounts tangent arms towards the rear (better
interface with GoTo system?) |

The
hole site for anchor pin was marked with nail, and the hole was drilled
with a 1/16" drill bit. (Note: These encoders are
4000 tick encoders that were replaced the same day with the 10000 tick
encoders for the Argo Navis.) |

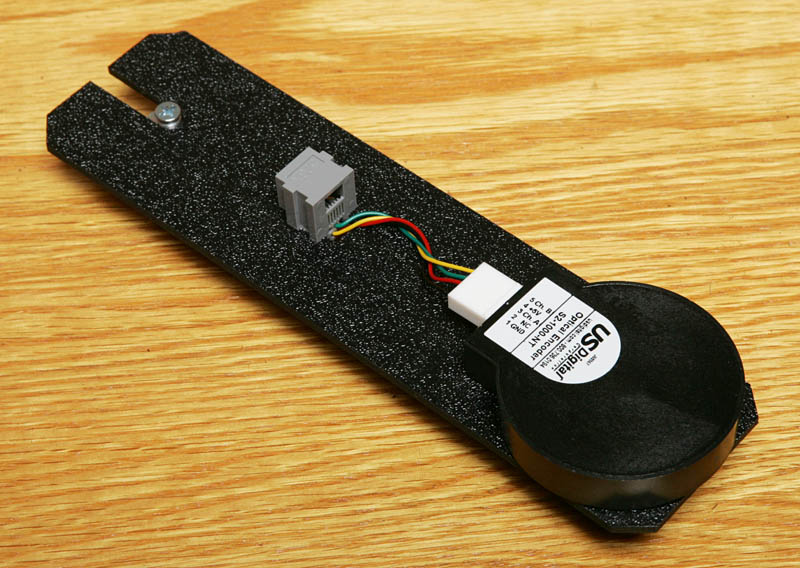
The
anchor pin was fixed in place with a 6 x 1 1/2 wood screw. |

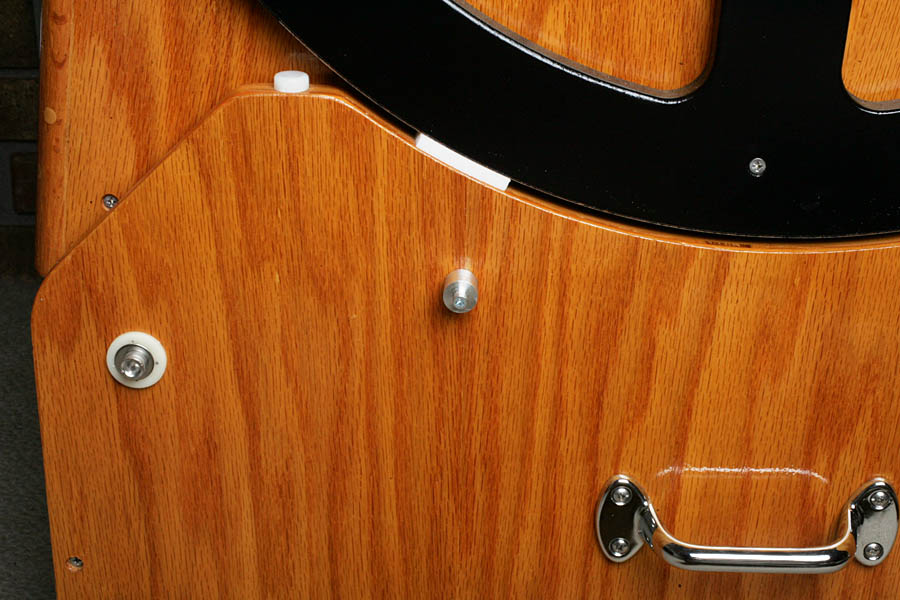
The
one minor problem with the Sky Engineering encoder mounting kit is that
the holes for the elevation coupler just barely allow the wood screws to
purchase the altitude bearing on the Starmaster. The Starmaster name
plate has been removed to allow the coupler to sit flat and orient the
encoder shaft hole as close to perpendicular on the bearing surface as
possible (paint chipped out where the name plate had been attached).
Rick Singmaster avoids this hole alignment probem with a custom machined
aluminum coupler that mounts over the name plate and has holes drilled
farther away from the edge. See
photo. |

The
anchor pin hole site for the elevation tangent arm is located on the
rocker box using a similar process to that used for the locating and
drilling the azimuth pin hole. |

Elevation
tangent arm and encoder mounted in place. |

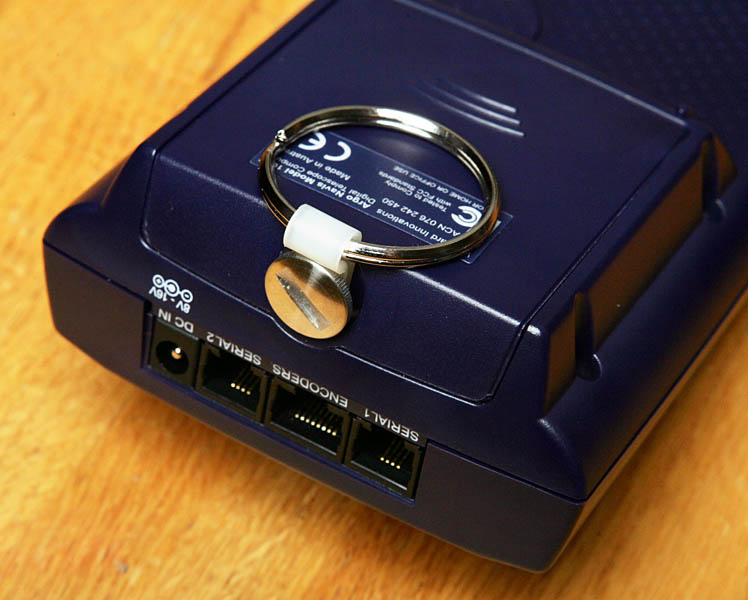
I used the battery compartment screw to affix an encoder cable clip to
the Argo Navis. The Argo Navis is well built and has a high quality
screw that treads into metal receiving threads. I used the encoder cable
clip to hold a split ring key for attachment. See the next photo legend
for details.
Note: The Argo Navis
comes with a mounting holster and screws/velcro strips to mount the
holster to the telescope. If you are mounting the computer on your upper
cage, however, the suggested method isn't secure as you raise and lower
the telescope. |

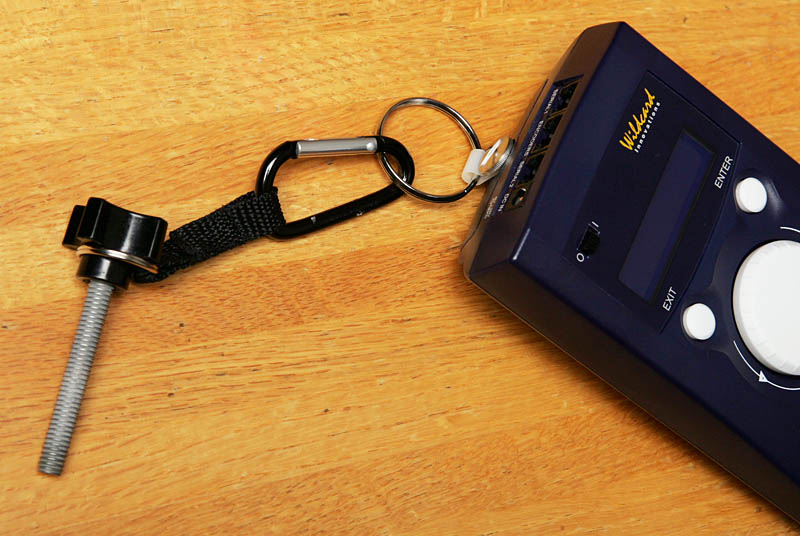
A
key clip with strap is used to attach the Argo Navis to the upper cage
via the knobbed assembly bolt. |

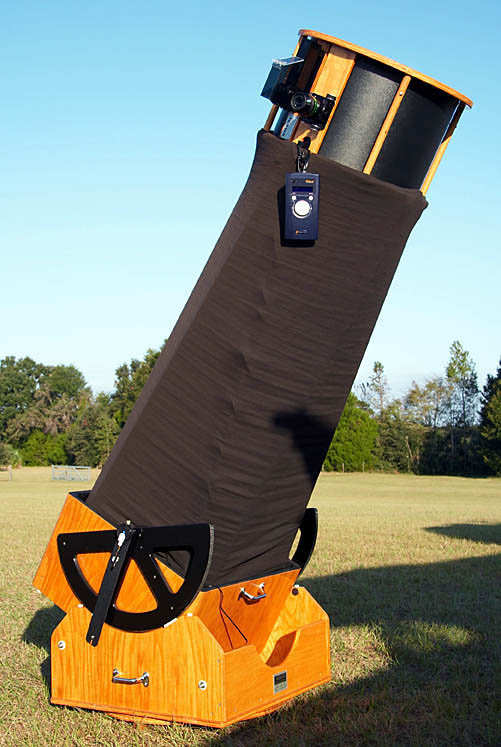
This
mounting method is very stable and secure. The computer repositions
roughly perpendicular to the ground as the telescope is raised and
lowered through normal observing motions. |

Argo
Navis on 18 inch Starmaster. With the computer mounted from the upper
cage, you always have the computer accessible at hand near your focuser,
eyepiece and Telrad. This is particularly handy when you are touring an
area of the sky while standing on a ladder. |
|
Comments on Argo Navis Use:
Initial
Setup: The Argo Navis comes with a very good user manual and very
clear instructions for setting up encoder resolution, direction, time,
location, etc. Setup is very simple and straightforward and only minimally
more complicated than setting up the Sky Commander.
Nightly
Alignment and Setup: The Argo Navis uses two star alignment (same
as the Sky Commander). It has one additional step, Mode fix alt ref
where you point your Starmaster straight up at 90 degrees to the rocker
box. This defines the altitude encoder reference point. After setting up
mode fix alt and doing two star alignment, you are set for the entire
evening.
Pointing accuracy: It is difficult for me to
say whether the Argo Navis points any more precisely than Sky Commanders I
have used in the past. I never had difficulty finding objects with the Sky
Commander which was very accurate. After alignment, the Argo Navis
consistently placed selected catalog objects in a circle outlined by a
Televue 12mm Nagler 4 with Paracorr (24 arcsec).
Ergonomics:
The rotating menu dial with enter and exit buttons is very simple and
intuitive to use. The controls are easy to use when you wear gloves.
Touring
function: This is one of the most useful functions to me. You can
tour objects in a constellation or region of the sky after defining the
angle of the field of the tour. The user has tremendous latitude in
setting parameters for the tour. In the middle of or at the end of an
observing session when your getting a bit punchy from fatique, it's fun to
go into area of sky you usually don't look at and punch in parameters
(e.g., non-stellar, magnitude 14 or greater) and just tour around that
region of the sky to find unfamiliar and surprising pearls of the heavens.
Data
display readout: Data for objects includes common names, size and
magnitude and features of morphology. These are very helpful for reference
when you are scrolling through objects in your tour choices.
After using the Argo Navis for a few nights, it is difficult for me to
imagine ever going back to using the Sky Commander. The magnitude of
computer performance compared to its price make the Argo Navis a good buy
for digital setting circle/computer users.
Equipment index
posted
31 October 2005, revised 01 November 2005


